TIC3001-REST-Tutorial
Tutorial: REST APIs and MongoDB
Introduction
This guide will introduce you to REST APIs and how to implement them by walking you through the development of a full stack address book application with CRUD functionalities with Javascript.

Tech Stack
Frontend
Backend
Testing
Prerequisites
Please ensure that you have the following installed on your computer before continuing with the rest of the guide:
- Install Node.js LTS
📝 Note: The LTS version of Node.js as of the time of writing this guide is 18.X.X. If you have a different version of Node.js installed and you need to change it, there is a useful guide here on how to do so using nvm.
- Install MongoDB Community Edition - Follow the installation guide for your OS
- Install Git
- Install Postman App
- Ensure you have an IDE of your choice installed (e.g. This guide was made using VSCode)
Brief overview of REST API
What is REST
A RESTful API (Representational State Transfer API) is a web-based architectural style for designing networked applications. It uses standard HTTP methods (e.g. GET, POST, PUT, DELETE) to perform CRUD (Create, Read, Update, Delete) operations on resources represented in a stateless manner. RESTful APIs are designed to be simple, scalable, and easy to consume, making them widely used for building web services and allowing different systems to communicate and interact over the internet. They typically respond with JSON or XML data and are the backbone of modern web applications and services.
Purpose of REST API
- Provides a standardized way to access and manipulate resources on a server using common HTTP methods (e.g.
GET,POST,PUT,DELETE). - REST APIs allow developers to build scalable, interoperable, and stateless web services that can be consumed by various clients, such as web browsers, mobile apps, and other backend systems. They promote a simple and uniform architecture, making it easier to integrate and interact with diverse systems, and they are widely used in modern web development for building APIs that serve data and functionalities to different applications.
REST API conventions
| Term | Description |
|---|---|
| Resource | The core concept in any RESTful API is resource. A resource is an object with a type, associated data, relationships to other resources, and a set of methods that operate on it. |
| Endpoint | One end of a communication channel in an API, typically identified by a URI, where requests are sent to access resource or trigger actions from web applications or servers, with responses returned to complete the interaction. Basically, the place that APIs send requests and where the resource lives, is called an endpoint. |
| Collection | Resources can be organized into collections, each of which is uniform, containing only a single type of resource, and unordered. |
- The endpoint refers directly to the resource and the HTTP verbs (e.g.
GET,POST,PUT,DELETE) specify the actions. - Typically takes 2 URI per resource
- One for the whole collection
- One for a single object in that collection
- For example, consider a fictional resource called
addressthat contains a list of addresses. The URI for the collection would be/addressesand the URI for a single address would be/addresses/:idwhere:idis the unique identifier of the address.
- You can also nest collections
Setting up the Frontend
1. Fork and clone the starter repository
We have created a starter repository for this guide here. This starter repository contains the code for the frontend of the application.
Fork this starter repository to your own Github account, then open your terminal and clone the forked repository into a directory of your choice.
// navigate to directory of your choice
cd <path to directory of your choice>
NOTE: in this example we will use the director to be Toolbox-REST-SampleCode

// clone the starter repository
git clone https://github.com/<your github username>/Toolbox-REST-SampleCode.git
2. Install the required dependencies
Now that you have cloned the starter repository, you will need to navigate to it and install the dependencies required for the frontend of the application. The dependencies are listed in the package.json file in the root directory of the starter repository.
// navigate to starter repository
cd Toolbox-REST-SampleCode

// install dependencies
npm install
3. Start up the frontend
You can now run the frontend of the application at localhost:3000 by simply executing the command npm run dev.
Setting up the Backend
1. Initialise the backend directory
You will now need to create a new folder backend within the starter repository to contain the source code for the backend of the application.
You can do so via your IDE or by executing the command mkdir backend
2. Initialise the package.json file
package.json is a file that contains important information about an application such as the entry point of the application, required dependencies and more. You can read more about it here if you are interested.
You can create this file in the backend directory that you just created by running npm init. The steps are as follows:
// navigate to backend directory
cd backend

// create package.json file
npm init
💡Tip:
npm initis an interactive command that will prompt you for some information. You can accept all the default arguments for this application.
3. Install the required dependencies
As mentioned earlier in the Tech Stack section, you will be using Express.js for the backend of this application, so you will need to install it.
In addition, you will also be installing the following tools that will help to ease your development process:
- nodemon reloads the backend server automatically when changes are made to the source code so that you don’t have to manually restart it yourself.
- dotenv allows you to make use of environmental variables defined in a
.envfile to protect secrets. - cors allows you to enable CORS options and configure which domains your backend server can receive requests from. You can read more about CORS here if you are interested.
You can install all these dependencies by executing these commands:
// install Express.js locally
npm i --save express

// install dotenv locally
npm i --save dontenv

// install cors locally
npm i --save cors

// install nodemon locally as a development dependency
npm i --save-dev nodemon
📝 Note: You can read more about the differences between –save and –save-dev here if you are interested.
4. Set up Express.js server
Create an index.js file in the backend directory and add the following lines of code. Make sure to read the inline comments to gain a better understanding of how the Express.js server works:
// import the dependencies required for Express.js
const express = require('express')
// import the dependencies required for cors
const cors = require('cors')

// initialize the Express.js application
// store it in the app variable
const app = express()

// allow cross-origin requests to reach the Expres.js server
// from localhost:3000, which is your frontend domain
app.options(
  '*',
  cors({
    origin: 'http://localhost:3000',
    optionsSuccessStatus: 200,
  }),
)
app.use(cors())

const PORT = 8080

// configure the Express.js application to run at port 8080
// since you will be running this application on your computer (localhost),
// the backend server will be running at http://localhost:8080
app.listen(PORT, () => {
  console.log(`Server is running on port ${PORT}...`)
})

// when a GET request is made to http://localhost:8080/,
// the response will be { message: 'Hello World' } in JSON format
app.get('/', (req, res) => {
  res.json({ message: 'Hello World' })
})

// export Express.js application to be used elsewhere
module.exports = app
Make sure to read the inline comments to gain a better understanding of how the Express.js server works.
5. Start up the backend
In the package.json file, you should see one test script under the scripts section. You will need to add another dev script as follows:
package.json

// rest of the code ...
"scripts": {
    "test": "echo \"Error: no test specified\" && exit 1",
    "dev": "nodemon index.js"
},
// rest of the code ...
Adding this script means that whenever you execute npm run dev in the backend directory, the nodemon tool will start up your backend server via the entry point index.js, which you had just set up in the previous step.
As such, you can execute the command npm run dev to run the backend server at localhost:8080.
Setting up the Database
📝 Note: In this section, you will continue to work in the
backenddirectory.
1. Install the required dependencies
You will need to install mongoose, which is an Object Relational Mapping (ORM) tool that makes it easier and simpler for developers to interact with MongoDB functionalities.
You can do so via executing the command npm install mongoose.
2. Initialise .env file for environmental variables
In your backend directory, create a file called .env. You can do so via the your IDE or by executing the command touch .env.
Then, add the following content to your .env file:
PORT=8080
MONGODB_URI="mongodb://127.0.0.1:27017/rest-api-example"
Here, you are specifying the connection string that can be used to connect to your database. The format for this connection string is <standard_prefix>://<host>:<port>/<database_name>. In this example:
<standard_prefix>is simplymongodb, which refers to the MongoDB Community Edition Server running on your computer.
You can read more about MongoDB connection strings here if you are interested.
3. Initialise the database and connect to it
⚠️ Warning: This step will require you to have MongoDB server running on your computer, which should be the case if you followed the Prerequisites section and correctly followed the MongoDB installation guide for your OS. If not, please do it before continuing with the rest of this guide.
You will need to create a folder called config under your backend directory. You can do so via your IDE or by executing the command mkdir config.
Then, you will need to create a file called db.js. You can do so via your IDE or by executing the following commands:
// navigate to config directory
cd config

// create db.js file
touch db.js
In your db.js file, add the following code. Make sure to read the inline comments to gain a better understanding of how setting up a connection to MongoDB works:
// import dependencies required for mongoose
const mongoose = require('mongoose')

// function to start up and connect to MongoDB database
const connectDB = async () => {
  try {
      // attempt to connect to MongoDB database via the connection string specified in .env file
    const con = await mongoose.connect(process.env.MONGODB_URI) // read from the .env file
    console.log(`MongoDB Connected: ${con.connection.host}`)
  } catch (error) {
    console.log(error)
    process.exit(1)
  }
}

// export connection function to be used in index.js
module.exports = connectDB
Make sure to read the inline comments to gain a better understanding of how setting up a connection to MongoDB works.
Now, you will need to make use of this connectDB function in the backend entrypoint index.js. Make the following changes to index.js to connect to the MongoDB database when starting up the backend server:
/** code to import the express and cors dependencies ... (same as before) **/

// ADD the following code:

// import the dependencies required for dotenv
// the config() function allows for reading of the .env file
const dotenv = require('dotenv').config()
// import the connectDB function created earlier
const connectDB = require('./config/db')

// initialize connection to MongoDB database
connectDB()


/**
 * code to initialize the Express.js application store it in the app variable ... (same as before)
 * code to allow cross-origin requests to reach the Express.js server ... (same as before)
**/

// THEN replace const PORT = 8080 with the following:

// use 8080 as a fallback if PORT is undefined in .env file
const PORT = process.env.PORT || 8080

/** rest of the code ... (same as before) **/
Implementing REST API
📝Note: In this section, you will continue to work in the root of the
backenddirectory.
This is what the folder structure of the backend directory will look like by the end of this section:
├── backend
│   ├── config
│   ├── controllers
│   ├── models
│   └── routes
controllerscontains functions that will be handling business logic.modelscontains your mongoose Models, which essentially act as an interface to interact with different schemas in the MongoDB database.routescontains files that specify the endpoints supported by the backend server.

You can create these 3 new folders via your IDE or by executing the following commands:
// create controllers folder
mkdir controllers

// create models folder
mkdir models

// create routes folder
mkdir routes
1. GET - Fetch all addresses
Define the Address model
In the models directory, create addressModel.js with the following content:
const mongoose = require('mongoose')

const addressSchema = mongoose.Schema({
  title: {
    type: String,
    required: [true, 'Please enter address title'],
  },
  description: {
    type: String,
    required: [true, 'Please enter address description'],
  },
})

// export Address model to be used in controller
module.exports = mongoose.model('Address', addressSchema)
Define fetchAllAddresses function
In the controllers directory, create addressController.js. Here, you will define a function that will handle the logic behind fetching all the addresses from the MongoDB database:
// import Address model
const Address = require('../models/addressModel')

// @desc    Fetch all addresses
// @route   GET /api/addresses
// @access  Public
const fetchAllAddresses = async (req, res) => {
  // function provided by Mongoose to fetch all Address documents
  const addresses = await Address.find({})

  // return all addresses in JSON format
  // with success status 200
  res.status(200).json(addresses)
}

// export controller functions to be used in corresponding route
module.exports = { fetchAllAddresses }
Define API route
Your api endpoints for addresses will look something like this: /api/addresses/... e.g. /api/addresses/:id
In the routes directory, create addressRoutes.js, this is where we will define the specific endpoints.
const express = require('express')
const router = express.Router()

const { fetchAllAddresses } = require('../controllers/addressController')

// call the fetchAllAddresses function
// when a GET request is made to http://localhost:8080/api/addresses/
router.route('/').get(fetchAllAddresses)

module.exports = router
Then, you can add the following to index.js to connect the newly created address router:
/**
 * Import required dependencies, connect db and initialize Express.js application ... (same as before). i.e. same up to:
 * app.use(cors())
 **/

// ADD the following code:

// allow JSON data in request body to be parsed
app.use(express.json())
// allow URL-encoded data in request body to be parsed
app.use(express.urlencoded({ extended: false }))

/**
 * Define port and start up Express.js application ... (same as before). i.e. same up to:
 * app.listen(PORT, () => {...})
 **/

// ADD the following code:

// use the address router to handle requests
// at http://localhost:8080/api/addresses
app.use('/api/addresses', require('./routes/addressRoutes'))

/** rest of the code ... (same as before) **/
Test API route
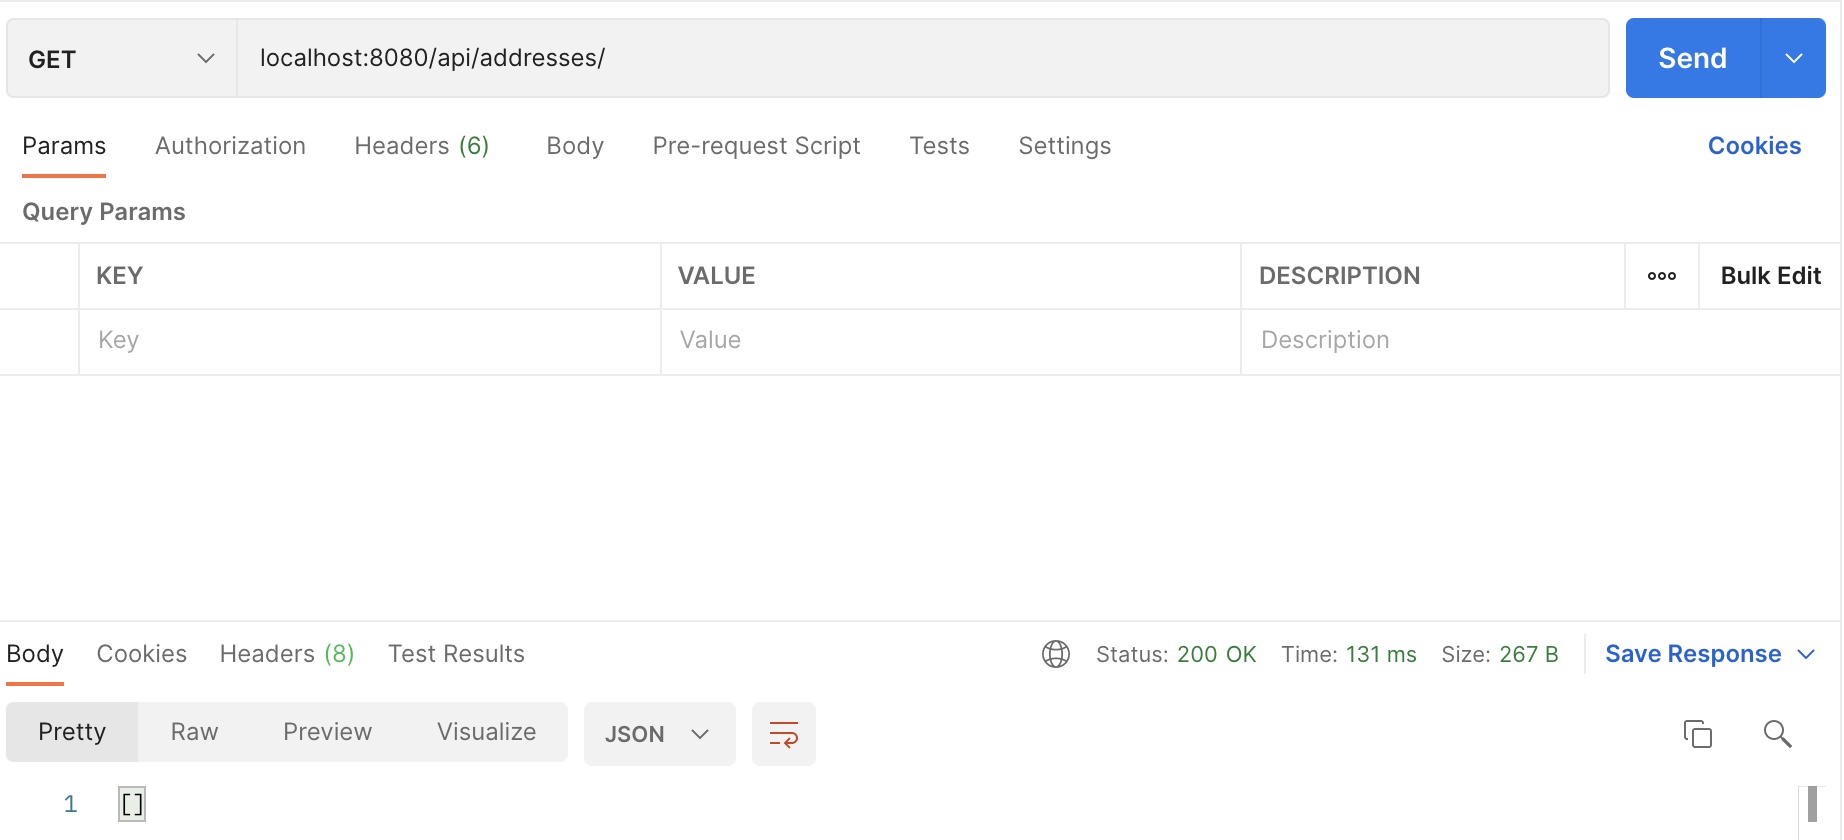
To test whether the endpoint works correctly, you can use Postman App to make a GET request to localhost:8080/api/addresses/
The output should be as follows if there is no address object in the MongoDB database:
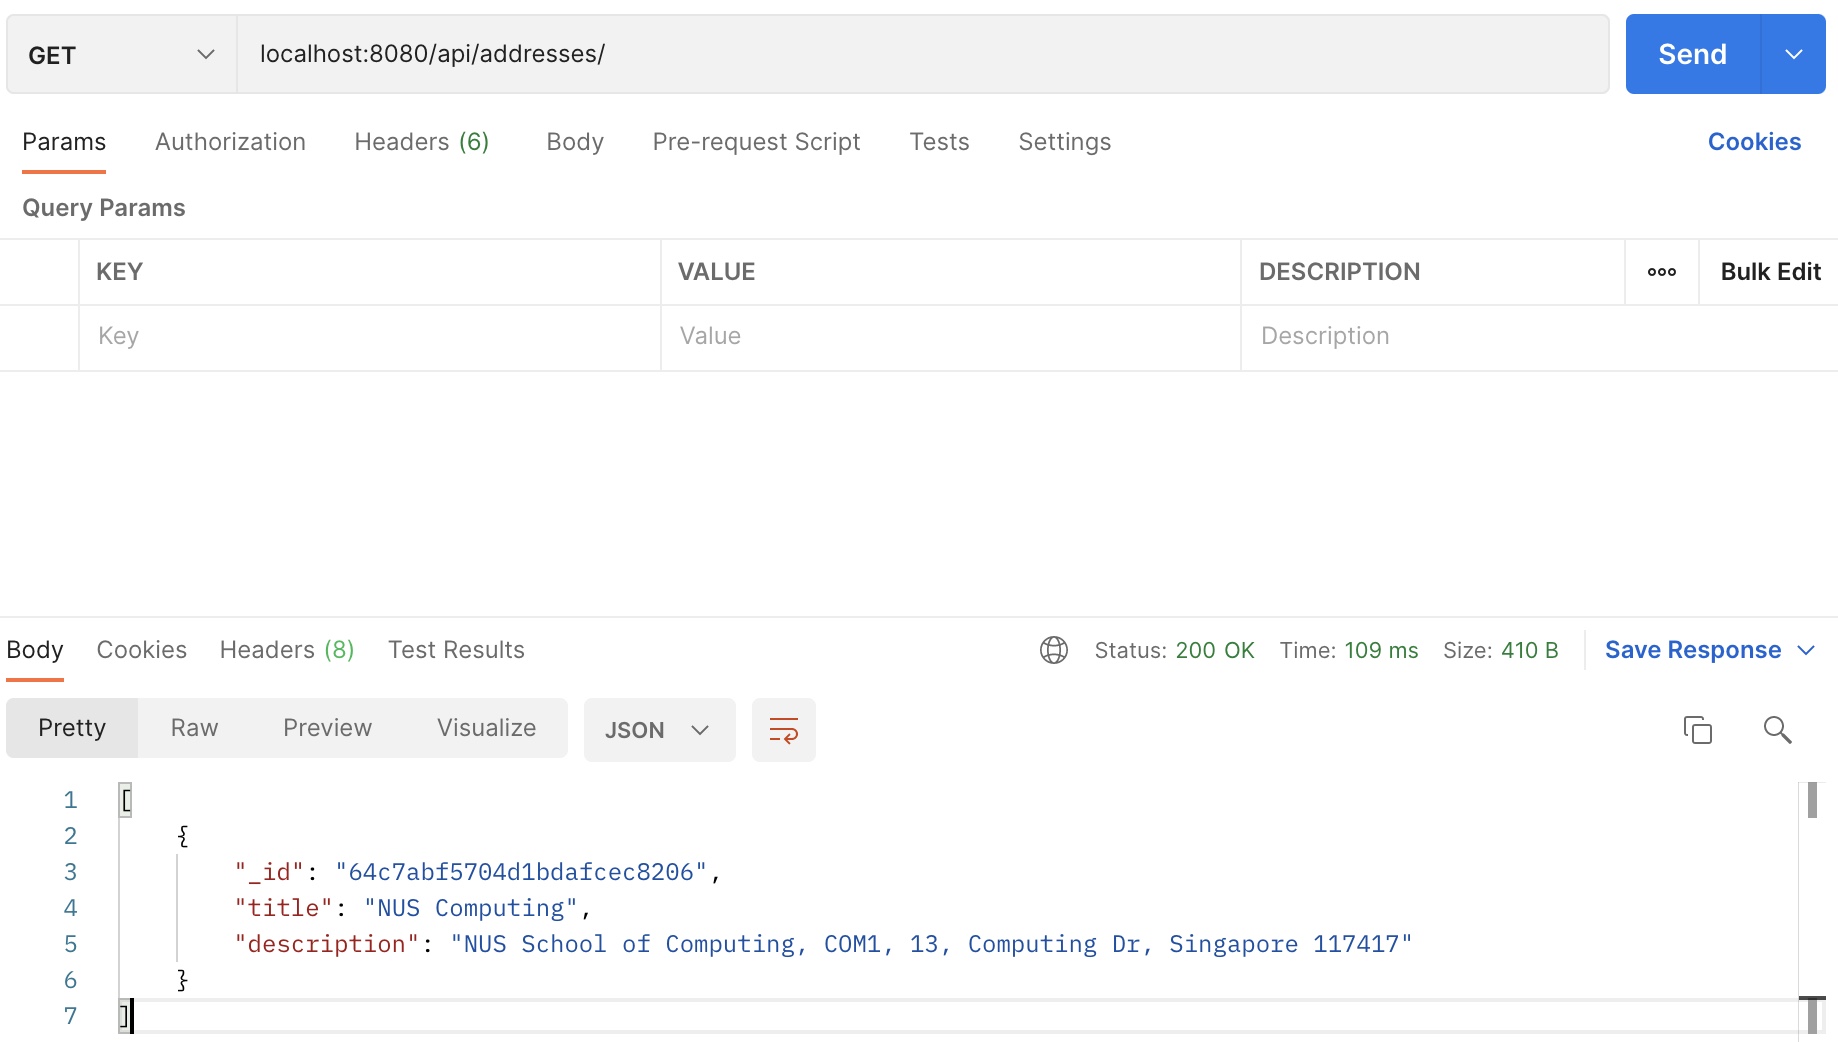
However, if you were to manually add an address first, it would look as follows:
2. POST - Add a new address
Define addAddress function
In addressController.js, you will define another function that will handle the logic behind adding a new address to the MongoDB database:
// rest of the code ...

// @desc    Add an address
// @route   POST /api/addresses
// @access  Public
const addAddress = async (req, res) => {
  const { title, description } = req.body

  // validate request body
  if (!title || !description) {
    return res.status(400).json({ message: 'Please enter all fields.' })
  }

  try {
    // function provided by Mongoose to create a new Address document
    const address = await Address.create({
      title,
      description,
    })

    // return the newly created Address in JSON format
    // with created success status 201
    res.status(201).json({
      _id: address._id,
      title: address.title,
      description: address.description,
    })
  } catch (error) {
    // catch exception when fields are missing
    res.status(400).json({ message: 'Invalid address data.' })
  }
}

// export controller functions to be used in corresponding route
module.exports = { fetchAllAddresses, addAddress }
Define API route
In addressRoutes.js, define another route as follows.
// rest of the code ...

const { fetchAllAddresses, addAddress } = require('../controllers/addressController')

// rest of the code ...

// call the addAddress function
// when a POST request is made to http://localhost:8080/api/addresses/
router.route('/').post(addAddress)

// rest of the code ...
Test API route
To test the endpoint, you can make a POST request to the endpoint using Postman App as follows:
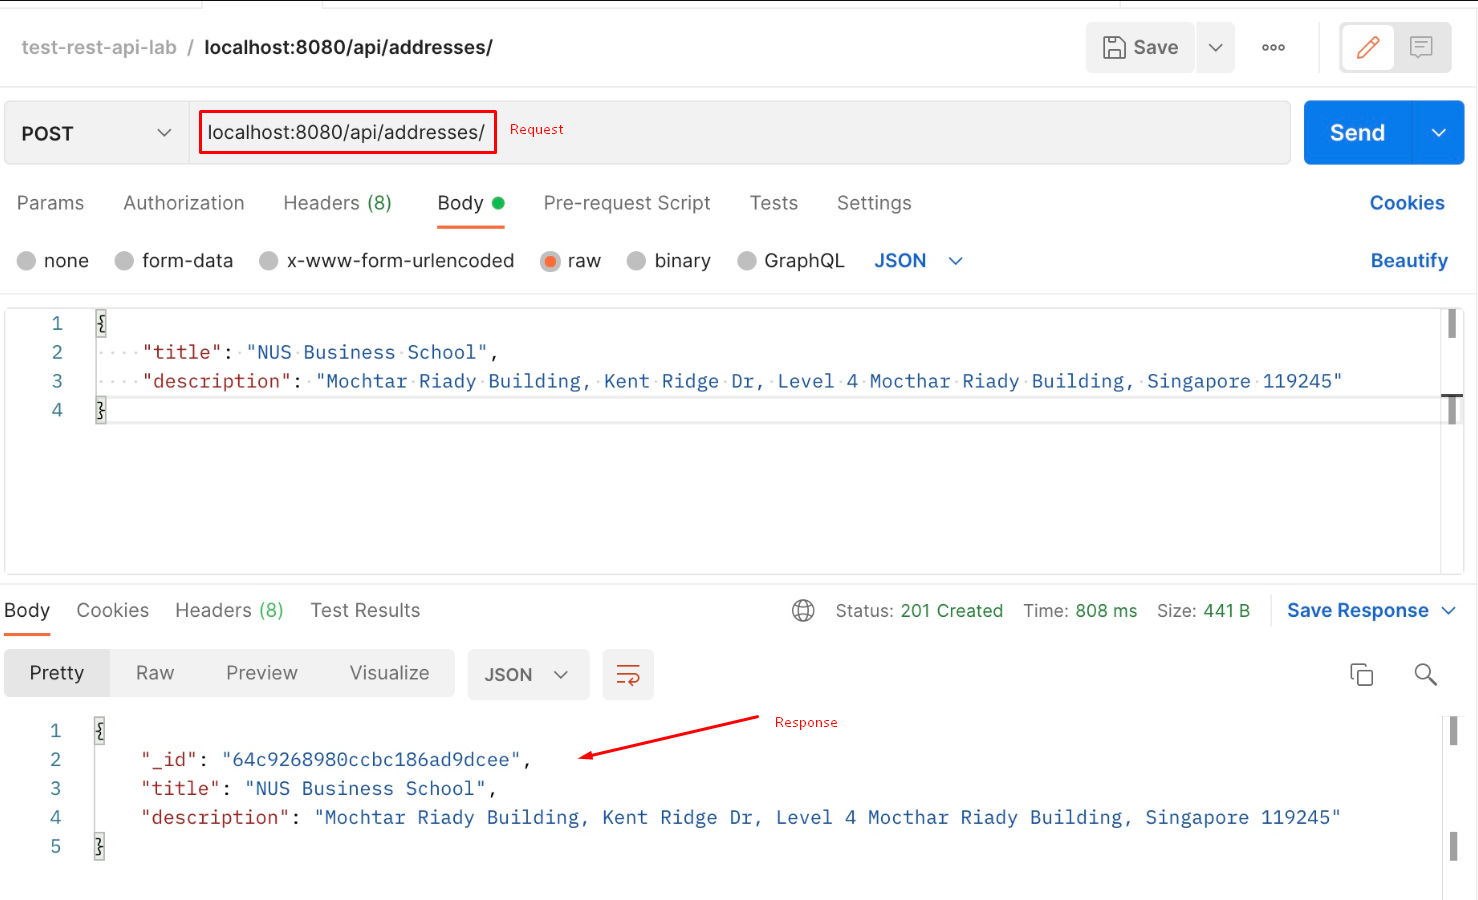
💡 Tip: Add a few more addresses to the database. For example, you can add an address for ‘NUS School of Computing’ with description ‘Somewhere in NUS’. Take note of the ID returned by the
POSTrequest as you will need it to test thePUTandDELETEendpoints later on.
PUT - update an existing address
Define updateAddress function
In addressController.js, you will define another function that will handle the logic behind updating an existing address to the MongoDB database:
// rest of the code ...

// @desc    Update an address
// @route   PUT /api/addresses
// @access  Public
const updateAddress = async (req, res) => {
  const { title, description } = req.body

  // validate request body
  if (!title || !description) {
    return res.status(400).json({ message: 'Please enter all fields.' })
  }

  try {
    // function provided by mongoose to find an
    // Address document with a given ID
    // req.params.id is retrieved from /:id in route
    const address = await Address.findById(req.params.id)

    // update the document
    address.title = title
    address.description = description

    // function provided by mongoose to
    // save the changes made to a document
    await address.save()

    // return the updated address in JSON format
    // with success status 200
    res.status(200).json({
      _id: address._id,
      title: address.title,
      description: address.description,
    })
  } catch (error) {
    res.status(400).json({ message: 'Invalid address data.' })
  }
}

// export controller functions to be used in corresponding route
module.exports = { fetchAllAddresses, addAddress, updateAddress }
Define API route
In addressRoutes.js, define another route as follows.
// rest of the code ...

const { fetchAllAddresses, addAddress, updateAddress } = require('../controllers/addressController')

// rest of the code ...

// call the updateAddress function
// when a PUT request is made to http://localhost:8080/api/addresses/:id
router.route('/:id').put(updateAddress)

// rest of the code ...
Test API route
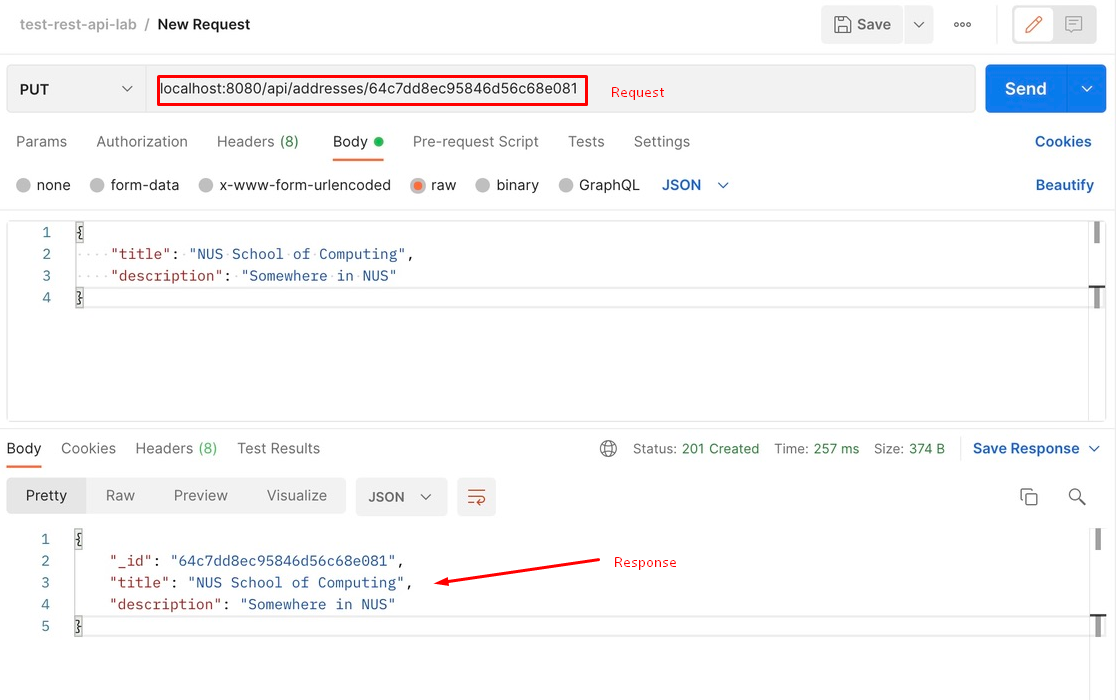
To test the endpoint, you can make a PUT request to the endpoint using Postman App as follows.
In this example, the ID we want to update is 64c7dd8ec95846d56c68e081. Note that you must make a request to the endpoint with the ID of the address that you want to update:
DELETE - delete an existing address
Define deleteAddress function
In addressController.js, you will define another function that will handle the logic behind deleting an existing address to the MongoDB database:
// rest of the code ...

// @desc    Delete an address
// @route   DELETE /api/addresses
// @access  Public
const deleteAddress = async (req, res) => {
  try {
    // function provided by mongoose to find an
    // Address document with a given ID
    // req.params.id is retrieved from /:id in route
    const address = await Address.findById(req.params.id)

    // function provided by mongoose to delete a document
    await address.deleteOne()


    res.status(200).json({ message: 'Address removed' })
  } catch (error) {
    res.status(404).json({ message: 'Address not found' })
  }
}

// export controller functions to be used in corresponding route
module.exports = { fetchAllAddresses, addAddress, updateAddress, deleteAddress }
Define API route
In addressRoutes.js, define another route as follows.
// rest of the code ...

const { fetchAllAddresses, addAddress, updateAddress, deleteAddress } = require('../controllers/addressController')

// rest of the code ...

// call the deleteAddress function
// when a DELETE request is made to http://localhost:8080/api/addresses/:id
router.route('/:id').delete(deleteAddress)

// rest of the code ...
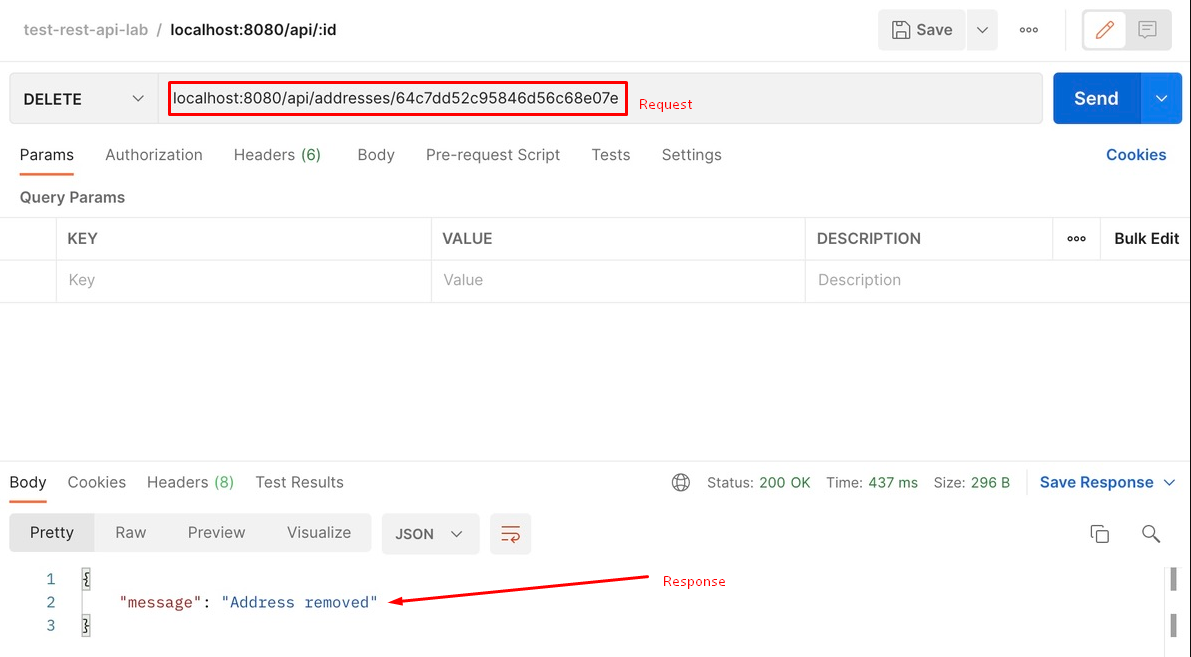
Test API route
To test the endpoint, you can make a DELETE request to the endpoint using Postman App as follows.
In this example, the ID we want to delete is 64c7dd52c95846d56c68e07e. Note that you must make a request to the endpoint with the ID of the address that you want to update:
Integrating with the Frontend
📝 Note: For this section, you will be working in the root directory of the repository as you will be making changes in the frontend code. Make sure to navigate such that your working directory is
<directory of your choice>/Toolbox-REST-SampleCode.
You will need to install axios, a useful tool that will allow you to make requests to the backend server. You can do so by executing the command npm install axios.
Understanding the folder structure
This is what the folder structor of the starter repository should look like at this point:
├── .next
├── app
    ├── page.js
    ├── ...
├── backend
├── components
├── node_modules
├── public
├── ...
componentscontains reusable UI componentsapp/page.jsis the file that contains the code for the single-page frontend application
Fetch all addresses
To fetch and display all addresses on the frontend, you can make a GET request to http://localhost:8080/api/addresses/ from the AddressCardList component in AddressCardList.jsx. This can be found in the components directory.
Replace the existing addresses variable with the useState hook and fetch the data as follows:
// rest of the code ...

const [addresses, setAddresses] = useState([])

useEffect(() => {
    const fetchAddresses = async () => {
      try {
        // make a GET request to backend server via axios
        const response = await axios.get('http://localhost:8080/api/addresses')
        // update the addresses state with the retrieved data
        setAddresses(response.data)
      } catch (error) {
        console.error('Error fetching addresses:', error)
      }
    }

    fetchAddresses()
}, [addresses])
Add a new address
To add a new address via the frontend, you can make the InputButton component in InputButton.jsx (in the component directory) fire a POST request to http://localhost:8080/api/addresses/ when it is clicked.
Here are some code snippets to help you get started:
// rest of the code ...
const onSubmit = async (data) => {
  try {
    await axios.post('http://localhost:8080/api/addresses', data)
    setOpen(false)
  } catch (error) {
    console.error('Error creating address:', error)
  }
}
onSubmit can be used as follows in InputButton.jsx:
<form onSubmit={form.handleSubmit(onSubmit)} className="w-2/3 space-y-6">
  ... // form fields for title and description of address
  ... // existing InputButton code
</form>
Update an existing address
To update an existing address, you can define another onSubmit function that makes a PUT request to http://localhost:8080/api/addresses/:id
const onSubmit = async (data) => {
  try {
    await axios.put(
      `http://localhost:8080/api/addresses/${props.address._id}`,
      data,
    )
    setOpen(false)
  } catch (error) {
    console.error('Error updating address:', error)
  }
}
Delete an existing address
To delete an existing address, you can define a click handler that makes a DELETE request to http://localhost:8080/api/addresses/:id
const handleDeleteAddress = async () => {
    try {
      await axios.delete(
        `http://localhost:8080/api/addresses/${props.address._id}`,
      )
    } catch (error) {
      console.error('Error deleting address:', error)
    }
  }
Here is one example of howhandleDeleteAddress can be used:
<AlertDialogAction onClick={handleDeleteAddress}>Continue</AlertDialogAction>
References
Here are some of the resources that were used in the making of this guide. You may find these reads to be useful in helping to further your understanding of REST APIs and the best ways to implement them.